'Javascript'에 해당되는 글 33건

  1. 2020.02.25 #13 Redux in React
  2. 2020.02.25 #12 Redux
  3. 2020.02.24 #11 Asynchrony (비동기작업)
  4. 2020.02.24 #10 SPA 와 Routing
  5. 2020.02.24 #9 immer를 사용한 불변성(Immutability) 유지
  6. 2020.02.17 #8-1 컴포넌트 최적화
  7. 2020.02.17 #8 React todo-app 1
  8. 2020.02.17 #7 Component Styling
  9. 2020.02.14 #6 React Hooks
2020. 2. 25. 17:02

0. 작업환경설정

1. UI 구성

2. 프레젠테이셔널 컴포넌트 생성

3. 리덕스 생성

4. 리액트 앱에 리덕스 적용

5. 컨테이너 컴포넌트 생성

6. redux-actions라이브러리 적용


0. 작업환경설정

$ yarn create react-app react-redux-tutorial
$ cd react-redux-tutorial
$ yarn add redux react-redux
// redux 라이브러리 : createStore함수를 사용하여 스토어생성
// react-redux 라이브러리 : connect함수와 Provider컴포넌트를 사용하여 리액트에서 리덕스 관련작업 처리
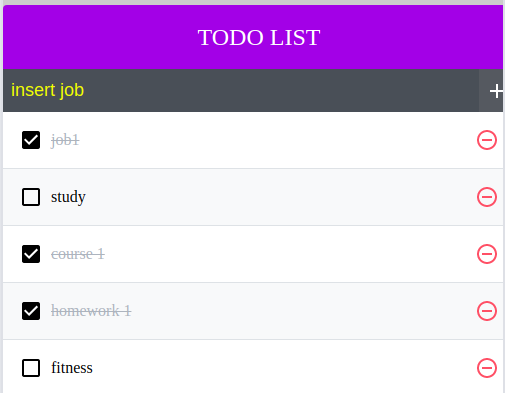


1. UI 구성

리덕스를 사용한 리액트 애플리케이션 UI 구조

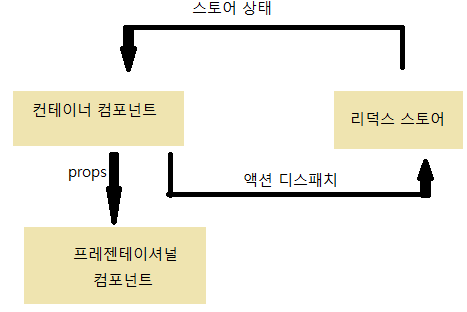
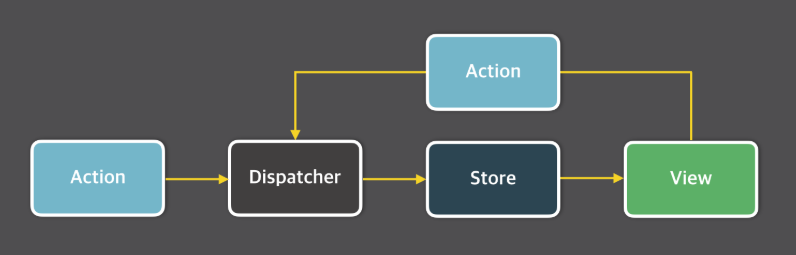
  • 프레젠테이셔널 컴포넌트 : 상태관리가 이루어지지 않고, 그저 props를 받아 와서 화면에 UI를 보여 주기만 하는 컴포넌트
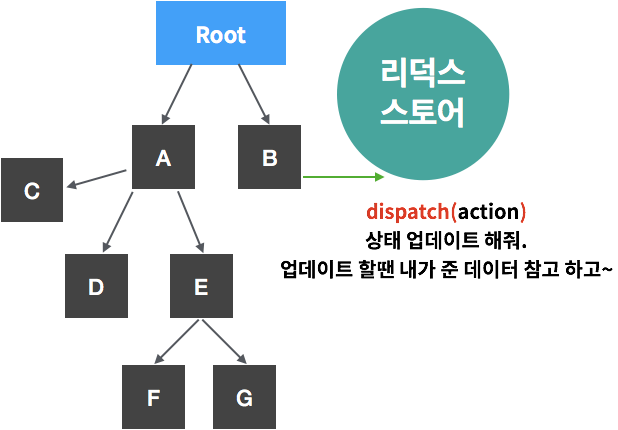
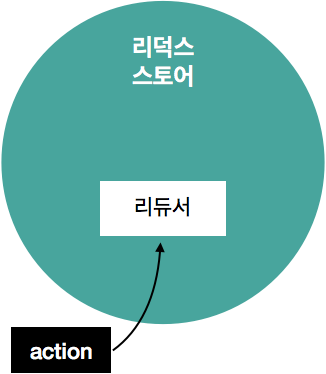
  • 컨테이너 컴포넌트 : 리덕스와 연동되어 있는 컴포넌트. 리덕스로 부터 상태를 받아오기도 하고 리덕스 스토어에 액션을 디스패치 함.


2. 프레젠테이셔널 컴포넌트 생성

// src/components/Todos.js

import React from 'react';

const TodoItem = ({ todo, onToggle, onRemove }) => {
  return (
    <div>
      <input type="checkbox" />
      <span>text</span>
      <button>remove</button>
    </div>
  );
};

const Todos = ({
  input,
  todos,
  onChangeInput,
  onInsert,
  onToggle,
  onRemove,
}) => {
  const onSubmit = e => {
    e.preventDefault();
  };

  return (
    <>
      <form onSubmit={onSubmit}>
        <input />
        <button type="submit">register</button>
      </form>
      <div>
        <TodoItem />
        <TodoItem />
        <TodoItem />
        <TodoItem />
      </div>
    </>
  );
};

export default Todos;


// src/App.js

import React from 'react';
import Todos from './components/Todos';
import './App.css';

function App() {
  return (
    <div>
      <Todos />
    </div>
  );
}

export default App;


3. 리덕스 생성

  • 일반적인 디렉토리 구조 : actions, constatns, reducers 3개의 디렉토리를 만들고 그안에 기능별로 파일을 하나씩 만든다
  • Ducks패턴 : 액션타입, 액션생성함수, 리듀서 모두를 '모듈'이라는 하나의 파일에 몰아서 작성하는 방식
// 모듈 생성
// src/modules/Todos.js : Ducks패턴

//action type
const CHANGE_INPUT = 'todos/CHANGE_INPUT';
const INSERT = 'todos/INSERT';
const TOGGLE = 'todos/TOGGLE';
const REMOVE = 'todos/REMOVE';

//action creator
export const changeInput = input => ({
  type: CHANGE_INPUT,
  input,
});

let id = 3; //insert가 호출될 때마다 1씩 증가
export const insert = text => ({
  type: INSERT,
  todo: {
    id: id++,
    text,
    done: false,
  },
});

export const toggle = id => ({
  type: TOGGLE,
  id,
});

export const remove = id => ({
  type: REMOVE,
  id,
});

// initial state
const initialState = {
  input: '',
  todos: [
    {
      id: 1,
      text: 'todo job 1',
      done: true,
    },
    {
      id: 2,
      text: 'todo job2',
      done: false,
    },
  ],
};

//reducer
function todos(state = initialState, action) {
  switch (action.type) {
    case CHANGE_INPUT:
      return {
        ...state,
        input: action.input,
      };
    case INSERT:
      return {
        ...state,
        todos: state.todos.concat(action.todo), //concat : 배열에 원소추가
      };
    case TOGGLE:
      return {
        ...state,
        todos: state.todos.map(todo =>
          todo.id === action.id ? { ...todo, done: !todo.done } : todo,
        ),
      };
    case REMOVE:
      return {
        ...state,
        todos: state.todos.filter(todo => todo.id !== action.id), // filter의 파라미터로 전달된 함수의 조건을 만족하는 요소들로만 구성된 새로운 배열 반환
      };
    default:
      return state;
  }
}

export default todos;


// 루트 리듀서 생성
// src/modules/index.js

import { combineReducers } from 'redux';
import Todos from './Todos';

// 스토어를 만들 때는 리듀서를 하나만 사용해야 하므로
// 리듀서가 여러개인 경우 combinereducers함수를 통해 하나로 묶는다.
const rootReducer = combineReducers({
  Todos,
});

export default rootReducer;


4. 리액트 앱에 리덕스 적용

// src/index.js

import React from 'react';
import ReactDOM from 'react-dom';
import './index.css';
import App from './App';
import * as serviceWorker from './serviceWorker';

import { createStore } from 'redux';
import rootReducer from './modules';
import { Provider } from 'react-redux';

const store = createStore(rootReducer);	// 스토어 생성

// Provider 컴포넌트로 리액트 프로젝트에 리덕스 적용
ReactDOM.render(
  <Provider store={store}>		
    <App />
  </Provider>,
  document.getElementById('root'),
);

// If you want your app to work offline and load faster, you can change
// unregister() to register() below. Note this comes with some pitfalls.
// Learn more about service workers: https://bit.ly/CRA-PWA
serviceWorker.unregister();


5. 컨테이너 컴포넌트 생성

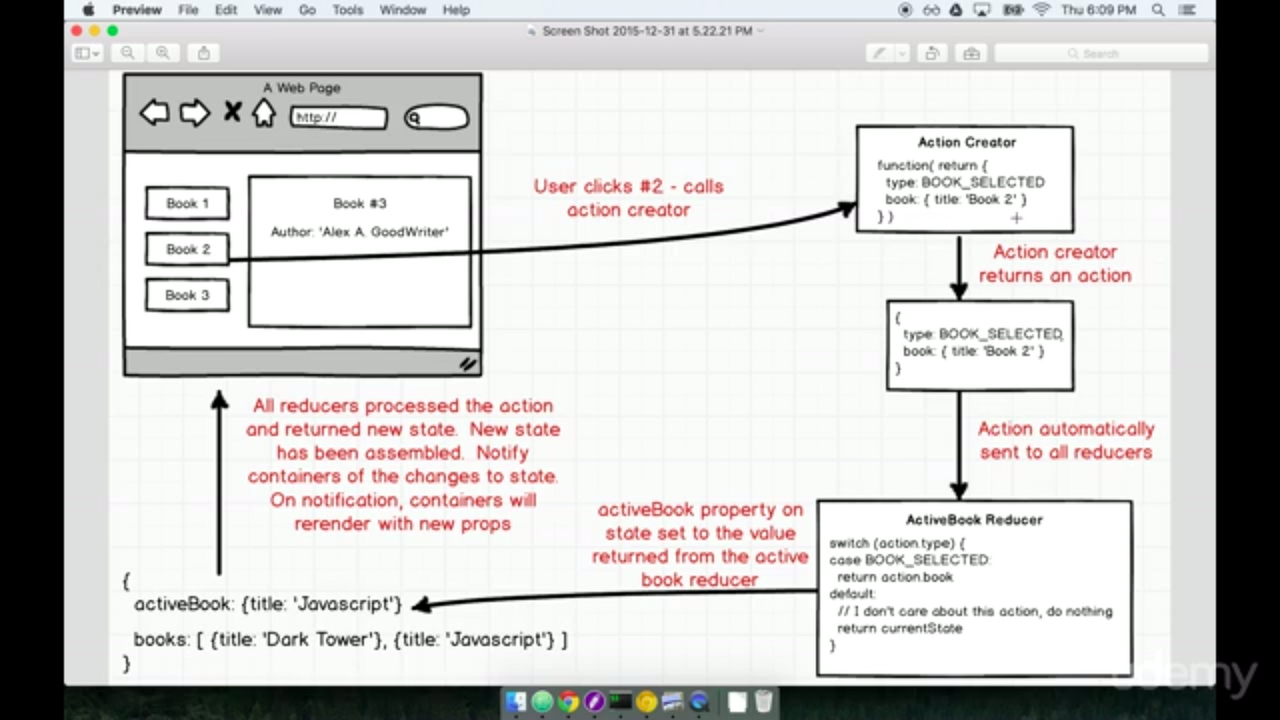
  • 컨테이너 컴포넌트와 리덕스를 연동하려면 react-redux에서 제공하는 connect함수를 사용
    => connect( mapStateToProps, mapDispatchToProps)(연동할컴포넌트)
    • mapStateToProps : 리덕스 스토어 안의 상태를 컴포넌트의 props로 넘겨주기 위한 함수. 현재 스토어 안의 state를 파라미터로 받는다
    • mapDispatchToProps : store의 내장함수 dispatch를 파라미터로 받아 이를 이용하여 액션생성함수를 컴포넌트의 props로 넘겨주기 위한 함수. 액션생성함수를 객체형태로 전달만 해도 connect 함수가 자동bindActionCreators 작업을 수행하므로 dispatch를 파라미터로 받지 않아도 된다.
    • mapStateToPropsmapDispatchToProps 에서 반환하는 객체 내부의 값들은 컴포넌트의 props로 전달된다.
// src/containers/TodosContainer.js

import React from 'react';
import { connect } from 'react-redux';
import { changeInput, insert, toggle, remove } from '../modules/Todos';
import Todos from '../components/Todos';

const TodosContainer = ({
  input,
  todos,
  changeInput,
  insert,
  toggle,
  remove,
}) => {
  return (
    <Todos
      input={input}
      todos={todos}
      onChangeInput={changeInput}
      onInsert={insert}
      onToggle={toggle}
      onRemove={remove}
    />
  );
};

const mapStateToProps = state => {
  return {
    input: state.todos.input,
    todos: state.todos.todos,
  };
};

// dispatch를 파라미터로 받지 않고, 액션생성함수를 객체형태로 전달만 해도
// connect 함수가 자동bindActionCreators 작업을 수행한다.
const mapDispatchToProps = {
  changeInput,
  insert,
  toggle,
  remove,
};

export default connect(mapStateToProps, mapDispatchToProps)(TodosContainer);


// src/App.js

import React from 'react';
import TodosContainer from './containers/TodosContainer';
import './App.css';

function App() {
  return (
    <div>
      <TodosContainer />
    </div>
  );
}

export default App;


// src/components/Todos.js

import React from 'react';

const TodoItem = ({ todo, onToggle, onRemove }) => {
  return (
    <div>
      <input
        type="checkbox"
        onClick={() => onToggle(todo.id)}
        checked={todo.done}
        readOnly={true}
      />
      <span style={{ textDecoration: todo.done ? 'line-through' : 'none' }}>
        {todo.text}
      </span>
      <button onClick={() => onRemove(todo.id)}>remove</button>
    </div>
  );
};

const Todos = ({
  input,
  todos,
  onChangeInput,
  onInsert,
  onToggle,
  onRemove,
}) => {
  const onSubmit = e => {
    e.preventDefault();
    onInsert(input);
    onChangeInput('');
  };
  const onChange = e => onChangeInput(e.target.value);
  return (
    <>
      <form onSubmit={onSubmit}>
        <input value={input} onChange={onChange} />
        <button type="submit">register</button>
      </form>
      <div>
        {todos.map(todo => (
          <TodoItem
            todo={todo}
            key={todo.id}
            onToggle={onToggle}
            onRemove={onRemove}
          />
        ))}
      </div>
    </>
  );
};

export default Todos;


6. redux-actions 라이브러리 적용

  • 액션생성함수, 리듀서를 작성할 때 redux-actions 라이브러리 활용하여 리액트 앱에서 리덕스를 훨씬 편하게 사용할 수 있다.
  • createAction : 매번 객체를 직접 만들어 줄 필요 없이 간단하게 액션 생성 함수 선언 가능
  • handleAction : 첫 번째 파라미터에는 각 액션에 대한 업데이트 함수, 두 번째 파라미터에는 초기 상태 전달.


'Javascript > Redux' 카테고리의 다른 글

#12 Redux  (0) 2020.02.25
middleware  (0) 2019.09.02
Redux Life Cycle  (0) 2019.08.29
Posted by yongminLEE
2020. 2. 25. 17:02


MVC vs Flux 

MVC의 문제점

  • MVC
    • 정의 : 애플리케이션 개발시 가장 많이 사용되는 디자인패턴으로, 컨트롤러(Controller)는 모델(Model)의 데이터를 조회하거나 업데이트하는 역할을 하며, 모델(Model)의 변화는 뷰(View)에 반영한다. 또한, 사용자는 뷰를 통해 데이터를 입력하는데 사용자의 입력은 모델에 영향을 준다.
    • 문제점 : 페이스북과 같은 대규모 애플리케이션에서는 Model이나 Model과 관련한 View가 대량으로 시스템에 추가되면 복잡도가 폭발적으로 증가하는데, 이 같은 의존성과 순차적 업데이트는 종종 데이터의 흐름을 꼬이게 하여 예기치 못한 결과를 불러일으킨다.

Flux 패턴

  • Flux
    • 정의 : MVC 패턴의 문제를 해결하기 위해 고안된 아키텍쳐
    • 단방향 데이터 흐름(unidirectional data flow) : Flux의 가장 큰 특징으로, 데이터의 흐름은 언제나 디스패처(Dispatcher)에서 스토어(Store)로, 스토어에서 뷰(View)로, 뷰에서 액션(Action)으로 다시 액션에서 디스패처로 흐른다.
    • 구성요소
      • dispatcher : Flux 애플리케이션의 모든 데이터 흐름을 관리하는 허브 역할. 
      • action : 액션생성자에의해 생성되고 상태 업데이트 할 때 참고해야 할 값을 가진 객체
      • store : 애플리케이션의 상태를 저장및 action객체를 수신하여 새로운 상태를 만들어서 반환


Redux

redux life cycle

  • 정의 : React에서 State를 좀더 효율적으로 관리하는데 사용하는 flux 패턴의 상태관리 라이브러리
  • 존에는 부모에서 자식의 자식의 자식까지 상태가 흘렀었는데, 리덕스를 사용하면 스토어를 사용하여 상태를 컴포넌트 구조의 바깥에 두어 스토어를 중간자로 두고 상태를 업데이트 하거나, 새로운 상태를 전달받음. 따라서, 여러 컴포넌트를 거쳐서 받아올 필요 없이(종속성 제거) 아무리 깊숙한 컴포넌트에 있다 하더라도 직속 부모에게서 받아오는 것 처럼 원하는 상태값을 골라서 props 를 편리하게 받아올 수 있음.
  • 리덕스 구조
    • action : 상태변화를 일으킬 때 참조하는 객체
    • action creator : 액션객체를 생성하는 함수
    • reducer : 현재상태와 액션객체를 파라미터로 받아 새로운 상태를 반환하는 함수
    • store : 애플리케이션의 상태, 리듀서, 몇가지 함수들을 내장
    • dispatch : 스토어에 내장된 함수로 액션객체를 파라미터로 받아 액션객체를 스토어에게 전달한다. 이후, 스토어는 리듀서 함수를 실행.
    • subscribe : 스토어의 내장 함수. 파라미터로 리스너 함수를 전달하여 subscribe함수를 호출하면, 액션이 디스패치되어 상태가 업데이트될 때마다 리스너함수를 실행.
  • 리덕스 라이프 사이클
    • event 발생 -> action creator 호출
    • action creator는 action(object) 생성
    • 생성된 action은 모든 middleware를 거쳐 모든 reducer들에게 전달
    • reducer는 action type에 따른 state반환
    • state는 app의 state에 덮어쓰이고 모든 container들에게 전달
    • 컴포넌트 리렌더링 
  • 상태업데이트 예시

1. 스토어설정
2. 컴포넌트의 스토어 subscribe
3. dispatch
4. 상태 업데이트


5. 리렌더링

  • 리덕스 규칙
    • 단일 스토어 : 하나의 애플리케이션에는 하나의 스토어만 존재
    • 읽기 전용 : 리덕스의 상태는 항상 읽기 전용
    • 리듀서는 의존성 없는 순수함수 : 리듀서 함수는 인전상태와 액션 객체를 파라미터로 받고 파라미터 외의 값에는 의존하지 않는 순수함수이다.


참고 : https://velopert.com/3528

'Javascript > Redux' 카테고리의 다른 글

#13 Redux in React  (0) 2020.02.25
middleware  (0) 2019.09.02
Redux Life Cycle  (0) 2019.08.29
Posted by yongminLEE
2020. 2. 24. 16:44


1. Asynchrony ?

2. axios

3. 예제


1. Asynchrony ?

  • 정의 : 비동기작업은 이전 작업이 끝날때 까지 기다릴 필요 없이 다른 작업을 진행하는 것.
  • Ajax (Asynchronous Javascript And Xml)
    : 브라우저가 가지고있는 XMLHttpRequest 객체를 이용해서 전체 페이지를 새로 고치지 않고도 페이지의 일부만을 위한 데이터를 로드하는 기법
  • callback : 특정 로직이 끝났을때 실핼항 동작을 정의하고 있는 함수

  • promise : 어떤 작업이 성공했을 때(resolve), promise 객체의 then() 함수에 넘겨진 파라미터(함수)를 단 한번만 호출하겠다는 약속. callback 의 경우 제어권이 호출되는 함수로 넘어가 버리기 때문에 신뢰성이 다소 떨어지지만 promise 는 함수 실행이 성공했을때 then() 함수의 파라미터(함수)가 단 한번만 호출되기 때문에 함수를 호출하는 입장에서 확신을 가지고 코드를 작성할 수 있습니다. 또한 실패했을 경우(reject)에도 catch()함수를 통해서 실패 이후의 작업을 처리할 수 있습니다. 
    • 대기(pending): 이행하거나 거부되지 않은 초기 상태.
    • 이행(fulfilled): 연산이 성공적으로 완료됨.
    • 거부(rejected): 연산이 실패함.


  • async/await : promis를 더욱 쉽게 사용할 수 있도록 해주는 ES8문법.  function 키워드 앞에 async만 붙여주면 되고 비동기로 처리되는 부분 앞에 await만 붙여주면 됩니다. 다만, 몇 가지 주의할 점이 있다면 await 뒷부분이 반드시 promise 를 반환해야 한다는 것과 async function 자체도 promise 를 반환한다는 것입니다. 


2. axios

  • 정의 : 리액트 애플리케이션에서 ajax를 더욱 쉽게 구현하기 위한 promis기반 http통신 라이브러리
  • axios 예제1 (async/await 미적용)
//axios 예제1 (async/await 미적용)
import React, { useState } from 'react';
import axios from 'axios';
import './App.css';

const App = () => {
  const [data, setDate] = useState(null);
  const handleClick = () => {
    axios.get('https://jsonplaceholder.typicode.com/todos/1').then(response => {
      setDate(response.data);
    });
  };

  return (
    <>
      <div>
        <button onClick={handleClick}>불러오기</button>
      </div>
      {data && (
        <textarea
          row={7}
          value={JSON.stringify(data, null, 2)}
          readOnly={true}
        />
      )}
    </>
  );
};

export default App;
  • axios 예제2 (async/await 적용)
//axios 예제2 (async/await 적용)
import React, { useState } from 'react';
import axios from 'axios';
import './App.css';

const App = () => {
  const [data, setDate] = useState(null);

  const handleClick = async () => {
    try {
      const response = await axios.get(
        'https://jsonplaceholder.typicode.com/todos/1'
      );
      setDate(response.data);
    } catch (e) {
      console.log(e);
    }
  };

  return (
    <>
      <div>
        <button onClick={handleClick}>불러오기</button>
      </div>
      {data && (
        <textarea
          row={7}
          value={JSON.stringify(data, null, 2)}
          readOnly={true}
        />
      )}
    </>
  );
};

export default App;


3. 예제 : NewsViewer 프로젝트

3-1. UI 구성

// newsviewer/src/components/NewsItem.js

import React from "react";
import styled from "styled-components";

const StyledNewsItem = styled.div`
  display: flex;
  .thumbnail {
    margin-right: 1rem;
    img {
      display: block;
      width: 160px;
      height: 100px;
      object-fit: cover;
    }
  }
  .contents {
    h2 {
      margin: 0;
      a {
        color: black;
      }
    }
    p {
      margin: 0;
      line-height: 1.5;
      margin-top: 0.5rem;
      white-space: normal;
    }
  }
  & + & {
    margin-top: 3rem;
  }
`;

const NewsItem = ({ article }) => {
  const { title, description, url, urlToImage } = article;
  return (
    <StyledNewsItem>
      {urlToImage && (
        <div className="thumbnail">
          <a href={url} target="_blank" rel="noopener noreferrer">
            <img src={urlToImage} alt="thumbnail" />
          </a>
        </div>
      )}
      <div className="contents">
        <h2>
          <a href={url} target="_blank" rel="noopener noreferrer">
            {title}
          </a>
        </h2>
        <p>{description}</p>
      </div>
    </StyledNewsItem>
  );
};

export default NewsItem;


// newsviewer/src/components/NewsList.js

import React from "react";
import styled from "styled-components";
import NewsItem from "./NewsItem";

const StyledNewsList = styled.div`
  box-sizing: border-box;
  padding-bottom: 3rem;
  width: 768px;
  margin: 0 auto;
  margin-top: 2rem;
  @media screen and (max-width: 768px) {
    width: 100%;
    padding-left: 1rem;
    padding-right: 1rem;
  }
`;

const sampleArticle = {
  title: "제목",
  description: "내용",
  url: "https://google.com",
  urlToImage: "https://via.placeholder.com/160"
};

const NewsList = () => {
  return (
    <StyledNewsList>
      <NewsItem article={sampleArticle} />
      <NewsItem article={sampleArticle} />
      <NewsItem article={sampleArticle} />
      <NewsItem article={sampleArticle} />
    </StyledNewsList>
  );
};

export default NewsList;


//newsviewer/src/App.js

import React from "react";
import NewsList from "./components/NewsList";
import "./App.css";

function App() {
  return (
    <>
      <NewsList />
    </>
  );
}

export default App;


3-2. 데이터 연동

  • useEffect를 이용하여 컴포넌트가 처음 렌더링되는 시점에 API를 요청.
  • useEffect에서 반환하는 값은 cleanup함수 이므로 async를 붙이면 안된다. 따라서, useEffect 내부에서 async/await 사용시 함수 내부에서 async 키워드가 붙은 새로운 함수를 정의하여 사용
// newsviewer/src/components/NewsList.js

import React, { useState, useEffect } from "react";
import styled from "styled-components";
import NewsItem from "./NewsItem";
import axios from "axios";

const StyledNewsList = styled.div`
  box-sizing: border-box;
  padding-bottom: 3rem;
  width: 768px;
  margin: 0 auto;
  margin-top: 2rem;
  @media screen and (max-width: 768px) {
    width: 100%;
    padding-left: 1rem;
    padding-right: 1rem;
  }
`;

const NewsList = () => {
  const [articles, setArticles] = useState(null);
  const [loading, setLoading] = useState(null);
  const API_KEY = "-----------------------------";

  useEffect(() => {
    const fetchData = async () => {
      setLoading(true);
      try {
        const response = await axios.get(
          `http://newsapi.org/v2/top-headlines?country=us&category=business&apiKey=${API_KEY}`
        );
        setArticles(response.data.articles);
      } catch (e) {
        console.log(e);
      }
      setLoading(false);
    };
    fetchData();
  }, []);

  if (loading) {
    return <StyledNewsList>loading...</StyledNewsList>;
  }
  if (!articles) {
    return null;
  }

  return (
    <StyledNewsList>
      {articles.map(article => (
        <NewsItem key={article.url} article={article} />
      ))}
    </StyledNewsList>
  );
};

export default NewsList;


3-3. 카테고리 기능 구현

// newsviewer/src/components/Categories.js

import React from "react";
import styled, { css } from "styled-components";

const categories = [
  {
    name: "all",
    text: "all"
  },
  {
    name: "business",
    text: "business"
  },
  {
    name: "entertainment",
    text: "entertainment"
  },
  {
    name: "health",
    text: "health"
  },
  {
    name: "science",
    text: "science"
  },
  {
    name: "technology",
    text: "technology"
  }
];

const StyledCategories = styled.div`
  display: flex;
  padding: 1rem;
  width: 768px;
  margin: 0 auto;
  @media scree and (max-width: 768px) {
    width: 100%;
    overflow-x: auto;
  }
`;

const StyledCatgory = styled.div`
  font-size: 1.2rem;
  cursor: pointer;
  white-space: pre;
  text-decoration: none;
  color: inherit;
  padding-bottom: 0.3rem;

  &:hover {
    color: rgba(128, 128, 128, 0.3);
  }

  ${props =>
    props.active &&
    css`
      font-size: 600;
      border-bottom: 2px solid red;
      color: red;
      &:hover {
        color: white;
        background: red;
      }
    `}

  & + & {
    margin-left: 1rem;
  }
`;

const Categories = ({ category, handleSelect }) => {
  return (
    <StyledCategories>
      {categories.map(c => (
        <StyledCatgory
          key={c.name}
          active={category === c.name}
          onClick={() => handleSelect(c.name)}
        >
          {c.text}
        </StyledCatgory>
      ))}
    </StyledCategories>
  );
};

export default Categories;


// newsviewer/src/App.js

import React, { useState, useCallback } from "react";
import NewsList from "./components/NewsList";
import Categories from "./components/Categories";
import "./App.css";

function App() {
  const [category, setCategory] = useState("all");
  const handleSelect = useCallback(category => setCategory(category), []);

  return (
    <>
      <Categories category={category} handleSelect={handleSelect} />
      <NewsList category={category} />
    </>
  );
}

export default App;


// newsviewer/src/components/NewsList.js

import React, { useState, useEffect } from "react";
import styled from "styled-components";
import NewsItem from "./NewsItem";
import axios from "axios";

const StyledNewsList = styled.div`
  box-sizing: border-box;
  padding-bottom: 3rem;
  width: 768px;
  margin: 0 auto;
  margin-top: 2rem;
  @media screen and (max-width: 768px) {
    width: 100%;
    padding-left: 1rem;
    padding-right: 1rem;
  }
`;

const NewsList = ({ category }) => {
  const [articles, setArticles] = useState(null);
  const [loading, setLoading] = useState(null);
  const API_KEY = "-------------------------------";

  useEffect(() => {
    const fetchData = async () => {
      setLoading(true);
      try {
        const selectedCategory = category === "all" ? "" : `&category=${category}`;
        const response = await axios.get(
          `http://newsapi.org/v2/top-headlines?country=us${selectedCategory}&apiKey=${API_KEY}`
        );
        setArticles(response.data.articles);
      } catch (e) {
        console.log(e);
      }
      setLoading(false);
    };
    fetchData();
  }, [category]);

  if (loading) {
    return <StyledNewsList>loading...</StyledNewsList>;
  }
  if (!articles) {
    return null;
  }

  return (
    <StyledNewsList>
      {articles.map(article => (
        <NewsItem key={article.url} article={article} />
      ))}
    </StyledNewsList>
  );
};

export default NewsList;


3-4. react-router 적용

// newsviewer/src/pages/NewsPage.js

import React from 'react';
import Categories from '../components/Categories';
import NewsList from '../components/NewsList';

const NewsPage = ({ match }) => {
  // 카테고리가 선택되지 않았으면 기본값으로 all 적용
  const category = match.params.category || 'all';
  return (
    <>
      <Categories />
      <NewsList category={category} />
    </>
  );
};

export default NewsPage;


// newsviewer/src/App.js

import React from 'react';
import NewsPage from './pages/NewsPage';
import { Route } from 'react-router-dom';
import './App.css';

function App() {
  return (
    <>
      <Route path="/:category?" component={NewsPage} />
    </>
  );
}

export default App;


// newsviewer/src/components/Categories.js

import React from 'react';
import styled from 'styled-components';
import { NavLink } from 'react-router-dom';

const categories = [
  {
    name: 'all',
    text: 'all'
  },
  {
    name: 'business',
    text: 'business'
  },
  {
    name: 'entertainment',
    text: 'entertainment'
  },
  {
    name: 'health',
    text: 'health'
  },
  {
    name: 'science',
    text: 'science'
  },
  {
    name: 'technology',
    text: 'technology'
  }
];

const StyledCategories = styled.div`
  display: flex;
  padding: 1rem;
  width: 768px;
  margin: 0 auto;
  @media scree and (max-width: 768px) {
    width: 100%;
    overflow-x: auto;
  }
`;

const StyledCatgory = styled(NavLink)`
  font-size: 1.2rem;
  cursor: pointer;
  white-space: pre;
  text-decoration: none;
  color: inherit;
  padding-bottom: 0.3rem;

  &:hover {
    color: rgba(128, 128, 128, 0.3);
  }

  &.active {
    font-size: 600;
    border-bottom: 2px solid red;
    color: red;
    &:hover {
      color: white;
      background: red;
    }
  }

  & + & {
    margin-left: 1rem;
  }
`;

const Categories = () => {
  return (
    <StyledCategories>
      {categories.map(c => (
        <StyledCatgory
          key={c.name}
          activeClassName="active"
          exact={c.name === 'all'}
          to={c.name === 'all' ? '/' : `/${c.name}`}
        >
          {c.text}
        </StyledCatgory>
      ))}
    </StyledCategories>
  );
};

export default Categories;


'Javascript > React' 카테고리의 다른 글

#10 SPA 와 Routing  (0) 2020.02.24
#9 immer를 사용한 불변성(Immutability) 유지  (0) 2020.02.24
#8-1 컴포넌트 최적화  (0) 2020.02.17
#8 React todo-app 1  (0) 2020.02.17
#7 Component Styling  (0) 2020.02.17
Posted by yongminLEE
2020. 2. 24. 11:43


1. SPA

2. Routing

3. react-router를 이용한 SPA

4. SPA단점 및 해결방안


traditional page vs SPA

1.SPA, single-page application

  • 정의 : 한 개의 페이지로 이루어진 애플리케이션
  • 기존의 웹 애플리케이션은 화면 전환이 일어날 때마다 html을 서버에 새로 요청하면 사용장의 인터페이스에서 사용하고 있던 상태를 유지하기 어려웠다. 또한 바뀌지 않는 부분까지 새로 불러와 보여주므로 불필요한 로딩이 존재하여 비효율적이었다.
  • SPA는 기본적으로 웹 애플리케이션에 필요한 모든 정적 리소스를 최초에 한번 다운로드한다. 이후 새로운 페이지 요청 시, 페이지 갱신에 필요한 데이터만을 전달받아 페이지를 갱신하므로 전체적인 트래픽을 감소할 수 있고, 전체 페이지를 다시 렌더링하지 않고 변경되는 부분만을 갱신하므로 새로고침이 발생하지 않아 네이티브 앱과 유사한 사용자 경험을 제공할 수 있다.


2. Routing

  • 정의
    : 네트워크상에서 주소를 이용하여 목적지까지 경로를 체계적으로 결정하는 경로선택 과정. 즉, 다른 주소에 다른 화면을 보여 주는 것
  • routing 발전과정
    1. "전통적 링크 방식"은 현재 페이지에서 수신된 html로 화면을 전환하는 과정에서 전체 페이지를 새로 렌더링하게 되므로 새로고침이 발생한다. 간단한 웹페이지라면 문제될 것이 없겠지만 복잡한 웹페이지의 경우, 요청마다 중복된 HTML과 CSS, JavaScript를 매번 다운로드해야하므로 속도 저하의 요인이 된다.

      ex)  <a href = "index.html"> go main </a> 

    2. "AJAX"는 자바스크립트를 이용해서 비동기적(Asynchronous)으로 서버와 브라우저가 데이터를 교환할 수 있는 통신 방식. 전통적 링크방식과는 반대로 href 를 사용하지 않는다. AJAX 를 통해 서버에 필요한 리소스를 요청하고 응답을 하면 html 내의 내용을 렌더링한다. 필요한 부분만 렌더링을 하므로 기존의 방식보다 속도가 빠르다. 하지만, URL 의 변경이 없으므로 앞으로가기, 뒤로가기 등의 history 관리가 되지 않는다.

      ex) <a id="main"> go main </a>

    3. "Hash 방식"은 URI 의 fragment identifier (예: #home )의 고유기능인 앵커(anchor) 를 사용한다. fragment identifier는 URI 에서 # 으로 시작하는 문자열인데 hash 또는 hash mark 라고 불린다. href 어트리뷰트에 hash 를 사용한다. HOME 을 누르게 되면 hash 가 추가된 URI가 표시된다. hash 가 추가되면 URL 이 동일한 상태에서 URI 만 바뀌므로 서버에 어떤 요청도 하지않는다.즉, hash 가 변경되어도 요청이 보내지지않으므로 페이지의 새로고침이 발생하지 않는다.

      <a href = #main"> go main </a>

    4. "PJAX"방식은 HTML5의 History API인 pushstate  popstate 를 사용하고 href 방식에 path 를 사용하고있다. HOME 을 클릭하면 path 가 추가된 URI 가 서버로 요청된다. 그리고 이벤트를 캐치 한 후 preventDefault 를 사용해 서버로의 요청을 방지한다. 이후에 href 속성에 path 를 사용해 AJAX 요청을 한다. AJAX 요청은 주소창의 URL을 변경시키지않아 히스토리 관리가 안되는데 이 때 pushstate를 사용하면 주소창의 URL은 변경되고 히스토리가 남지만 요청을 하지 않으므로 페이지가 갱신되진 않는다. hash 방식에서는 URL이 변경되지않아 SEO 가 문제가 되지만 PJAX 는 페이지마다 고유의 URL 이 존재하기 때문에 아무 문제가 없다.

      <a href="/main"> go main </a>


3. react-router를 이용한 SPA

  • react-router 는, 써드파티 라이브러리로서, 비록 공식은 아니지만 (페이스북 공식 라우팅 라이브러리는 존재하지 않습니다) 가장 많이 사용되고 있는 라이브러리.
  • 이 라이브러리는 클라이언트 사이드에서 이뤄지는 라우팅을 간단하게 해주고 서버 사이드 렌더링도 도와주는 도구들도 포함되어있다. 추가적으로 (이 라우터는 react-native 에서도 사용가능)
  • <BrowserRouter>
    : 웹 애플리케이션에 HTML5의 History API를 사용하여 페이지를 새로고침하지 않고도 주소를 변경하고, 현재 주소에 관련된 정보를 props로 쉽게 조회하고 사용할 수 있도록 함.
  • <Route parh="주소규칙" component={보여 줄 컴포넌트}>
    : 어떤 규칙을 가진 경로에 어떤 컴포넌트를 보여 줄지 정의
  • <Link to="주소">
    : <Link> 컴포넌트를 사용하여 페이지 전환시, 페이지를 새로 불러오지 않고 애플리케이션은 그대로 유지한 상태에서 HTML5 History API를 사용하여 페이지의 주소만 변경 ( <a> 태그로 이루어져 있지만, 페이지 전환을 방지하는 기능이 내장)
  • url 파라미터 : 라우트로 사용되는 컴포넌트에게 props로 전달된 match 객체안의 params 값을 참조하여 사용
    일반적으로  url 파라미터는 특정 아이디 혹은 이름을 사용하여 조회할 때 사용됨.
  • url 쿼리 : 라우트로 사용된 컴포넌트에게 props로 전달된 location객체의 search 값을 참조하여 사용
    일반적으로 url 쿼리는 키워드 검색이나 페이지에 필요한 옵션을 전달할 때 사용됨.
  • history 객체 : 라우트로 사용된 컴포넌트에게 props로 전달되는 객체. history객체를 사용하여 라우터 API 호출 가능.
  • withRouter 함수 : 라우트로 사용되는 컴포넌트가 아니어도 match 객체, location 객체, history객체에 접근 가능하게 함.
  • <Switch> : 여러 Route를 감싸서 그중 일치하는 단 하나의 라우트만을 렌더링 
  • <NavLink> : 현재 경로와 Link에서 사용하는 경로가 일치하는 경우 특정 스타일 혹은 CSS 클래스를 적용


4. SPA 단점 및 해결방안

  • 단점
    • 앱의 규모가 너무 커지면 큰 자바스크립트 파일 때문에 페이지 로딩속도가 오래 걸린다
    • 페이지 로딩시 사용자가 실제로 방문하지 않을 수도 있는 페이지의 스크립트도 불러오게된다.
    • 자바스크립트 파일이 로딩되어 실행되는 짧은 시간 동안 흰페이지가 나타날 수 있다.
  • 해결방안
    • 서버사이드 렌더링 (UI를 서버에서 렌더링하는 것) 기법을 이용하여 지바스크립트 파일 다운로드가 완료되지 않은 시점에서도 html상의 콘텐츠를 제공하여 대기 시간 최소화 및 렌더링 성능을 개선


'Javascript > React' 카테고리의 다른 글

#11 Asynchrony (비동기작업)  (0) 2020.02.24
#9 immer를 사용한 불변성(Immutability) 유지  (0) 2020.02.24
#8-1 컴포넌트 최적화  (0) 2020.02.17
#8 React todo-app 1  (0) 2020.02.17
#7 Component Styling  (0) 2020.02.17
Posted by yongminLEE
2020. 2. 24. 10:42


1. Immutability ?

2. immer 사용법


1. Immutability ?

  • 정의 : Immutability(변경불가성)는 객체가 생성된 이후 그 상태를 변경할 수 없는 디자인 패턴을 의미
  • Javascript에서 객체는 참조(reference) 형태로 전달하고 전달 받는데, 그 객체가 참조를 통해 공유되어 있다면 그 상태가 언제든지 변경될 수 있기 때문에 문제가 될 가능성도 커지게 된다. 이 문제의 해결 방법은 비용은 조금 들지만 객체를 불변객체로 만들어 프로퍼티의 변경을 방지하는 것이다.
  • React에서 immutability
    • React 컴포넌트의 state 를 변경해야 한다면 객체의 값을 직접적으로 수정하면 절대 안되고, 무조건 setState( ) 를 통해 state 를 업데이트 해주어야한다.
    • 하지만 깊은 구조의 state 를 불변함을 유지하면서 업데이트 하려면 코드가 매우 복잡하게 되어 가독성이 떨어 매우 떨어지게된다.
    • immer 라이브러리를 사용하면 불변성 관리문제를 매우 간단하게 해결할 수 있다.


2. immer 사용법

//예시코드

import porduce from 'immer';

const baseState = [
    {
        todo: "Learn typescript",
        done: true
    },
    {
        todo: "Try immer",
        done: false
    }
]

const nextState = produce(baseState, draftState => {
    draftState.push({todo: "Tweet about it"});
    draftState[1].done = true;
});

// 반환값
nextState = {
  {
        todo: "Learn typescript",
        done: true
    },
    {
        todo: "Try immer",
        done: true
    },
      {    
          todo: "Tweet about it"
    }
}


'Javascript > React' 카테고리의 다른 글

#11 Asynchrony (비동기작업)  (0) 2020.02.24
#10 SPA 와 Routing  (0) 2020.02.24
#8-1 컴포넌트 최적화  (0) 2020.02.17
#8 React todo-app 1  (0) 2020.02.17
#7 Component Styling  (0) 2020.02.17
Posted by yongminLEE
2020. 2. 17. 18:17

출처 : https://yzzzzun.tistory.com/41?category=836401


리액트 컴포넌트 성능 최적화

지금까지는 리액트의 기본적인 내용에 대해서 공부했습니다. 리액트의 장점이 변경된 부분에 대해서 렌더링하기때문에 빠른속도를 자랑한다고 했는데 과연 우리가 만들어가는 코드가 빠른속도를 자랑할까요..? 리엑트를 다루는 기술의 ToDo 리스트를 구현해보았고 많은 데이터를 추가해봤습니다.

2500개의 array를 코드로 생성하여 todo 리스트를 만들었고 초기 4개의 데이터만 있었을 때보다 확실히 느려진걸 체감할 수 있습니다. 우선 느려진걸 체감했다면 왜? 어디서? 속도가 느려지는지 확인할 수 있어야 합니다.

크롬 개발자 도구(F12)를 실행하고 performance 탭을 켭니다. 탭을 켜고 왼쪽 상단 record 버튼을 눌러 사용자가 액션을 녹화하도록 합니다. 중간중간 막대그래프 형태로 컴포넌트의 업데이트 시간을 확인할 수 있습니다.


App컴포넌트를 업데이트하는데 1초라는 시간이 걸렸습니다... 만약 서비스를 하는데 리스트 아이템 하나를 변경하는 시간이 1초가 걸리면 사용자들이 난리가 나겠죠..?

이를통해 우리는 느려지는 원인을 파악할 수 있습니다. 앞서 컴포넌트가 렌더링 되는 상황을 다시 한번 복습하고 넘어가죠

  1. 자신이 전달받은 props가 변경될 때
  2. 자신의 state가 바뀔 때
  3. 부모 컴포넌트가 리렌더링될 때
  4. forceUpdate 함수가 실행될 때

우리가 녹화한 액션을 따라가보면 데이터를 하나 변경하는 순간 App 컴포넌트의 state가 변경됩니다. 그러면 App 컴포넌트가 리렌더링이 시작됩니다. 그러면 App컴포넌트 즉, 부모 컴포넌트가 리렌더링 되었으니 자식컴포넌트가 줄줄이 리렌더링 됩니다. 그럼 데이터 하나를 변경하는 순간 2500개의 컴포넌트들이 리렌더링 되는거죠...

우린 이런상황을 원하지 않습니다. 그저 변경한 하나의 리스트 아이템만 리렌더링 되도록 하고싶은거죠..

React.memo 를 사용해 컴포넌트 최적화

위에서 우린 컴포넌트 렌더링이 느려지는 이유를 확인하는 방법과 왜 느려지는지 원인을 파악했습니다. 컴포넌틀 리렌더링을 방지하는 방법은 shouldComponentUpdate라는 라이프 사이클 메서드를 사용해 이전과 현재의 props를 비교해 리렌더링을 막는 방법이 있었습니다.

하지만 위의 코드는 함수형 컴포넌트를 사용했고 라이프사이클 메서드를 사용할 수 없습니다. 대신 React.memo 함수를 사용해 props가 바뀌지 않으면 리렌더링 하지 않도록 설정하여 함수형 컴포넌트의 리렌더링을 최적화 할 수 있습니다.

import React from 'react';
import {
  MdCheckBoxOutlineBlank,
  MdCheckBox,
  MdRemoveCircleOutline
} from 'react-icons/md';
import cn from 'classnames';
import './TodoListItem.scss';

const TodoListItem = ({ todo, onRemove, onToggle }) => {
  const { id, text, checked } = todo;
  return <div>.....</div>;
};

export default React.memo(TodoListItem);

적용방법은 간단합니다. 이렇게 수정하면 todo, onRemove, onToggle props가 변경되지 않으면 리렌더링되지 않습니다. 하지만 깃헙에 있는 코드는 todos 배열이 업데이트 된다면 onRemove, onToggle 함수도 새롭게 바뀝니다. 결국 리렌더링 됩니다... 그렇다면 props로 넘어오는 함수가 변경되지 않도록 하려면 어떻게해야할까요??

useState를 사용하는 방법

const [todos, setTodos] = useState(createBulkTodos);
const onInsert = useCallback(text => {
  const todo = { id: nextId.current, text: text, checked: false };
  setTodos(todos.concat(todo));
  nextId.current += 1;
}, []);

보통 useState에서 setTodos를 통해 새로운 todos state를 파라미터로 넣는데, 대신 상태 업데이트를 어떻게 할지 정의하는 업데이트 함수를 파라미터로 전달할 수 있습니다. 이를 함수형 업데이트라고 합니다.

const onInsert = useCallback(text => {
  const todo = { id: nextId.current, text: text, checked: false };
  setTodos(todos => todos.concat(todo));
  nextId.current += 1;
}, []);

이렇게 함수형 업데이트를 사용하면 todos가 변경되어도 props로 전달되는 onInsert 함수는 변하지 않습니다.

useReducer를 사용하는 방법

import React, { useRef, useReducer, useCallback } from 'react';
import './App.css';
import TodoTemplate from './components/TodoTemplate';
import TodoInsert from './components/TodoInsert';
import TodoList from './components/TodoList';

function createBulkTodos() {
  const array = [];
  for (let i = 1; i <= 2500; i++) {
    array.push({
      id: i,
      text: `할일 ${i}`,
      checked: false,
    });
  }
  return array;
}

function todoReducer(todos, action) {
  switch (action.type) {
    case 'INSERT':
      return todos.concat(action.todo);
    case 'REMOVE':
      return todos.filter(todo => todo.id !== action.id);
    case 'TOGGLE':
      return todos.map(todo =>
        todo.id === action.id ? { ...todo, checked: !todo.checked } : todo,
      );
    default:
      return todos;
  }
}

const App = () => {
  const [todos, dispatch] = useReducer(todoReducer, undefined, createBulkTodos);
  // const [todos, setTodos] = useState(createBulkTodos);

  const nextId = useRef(2501);

  const onInsert = useCallback(text => {
    const todo = {
      id: nextId.current,
      text: text,
      checked: false,
    };
    dispatch({ type: 'INSERT', todo });
    // setTodos(todos => todos.concat(todo));
    nextId.current += 1;
  }, []);

  const onRemove = useCallback(id => {
    dispatch({ type: 'REMOVE', id });
    // setTodos(todos => todos.filter(todo => todo.id !== id));
  }, []);

  const onToggle = useCallback(id => {
    dispatch({ type: 'TOGGLE', id });
    // setTodos(todos =>
    //   todos.map(todo =>
    //     todo.id === id ? { ...todo, checked: !todo.checked } : todo,
    //   ),
    // );
  }, []);

  return (
    <TodoTemplate>
      <TodoInsert onInsert={onInsert} />
      <TodoList todos={todos} onRemove={onRemove} onToggle={onToggle} />
    </TodoTemplate>
  );
};

export default App;

useState를 사용하던 부분을 모두 주석처리하고 useReducer를 사용한 코드입니다. useReducer의 두번째 파라미터는 초기상태를 넣어주어야 합니다. undefined를 넣어주고 세번째 파라미터에 함수를 전달하면 컴포넌트의 맨처음 렌더링될때만 함수가 호출되어 state가 초기화 됩니다.

useReducer의 단점은 기존코드를 많이 고쳐야하는 단점이 있지만 컴포넌트 밖으로 상태 업데이트 로직을 빼낼 수 있는 장점이 있습니다. 편한쪽으로 선택하도록 합시다.

불변성의 중요성

리엑트 컴포넌트의 상태 업데이트에서 불변성을 지키는것이 아주 중요합니다. 컴포넌트의 상태가 업데이트 될때 리엑트 컴포넌트가 리렌더링 되는데 만약 불변성을 유지하지 않고 값을 바꿔버리면 바뀐값을 감지하지 못해 리렌더링이 필요한 시점에 이루어지지 않을 수 있습니다.

보통 전개연산자(spread 연산자)로 객체나 배열의 내부 값을 shallow copy 해서 사용하고 있습니다. 만약 배열이 객체로 구성되어있다면 배열의 원소까지 복사해서 사용해야하기때문에 복잡해 지지만 다음 포스팅에서 정리할 immer 라이브러리를 사용하면 되기때문에 걱정하지 않아도 됩니다. 우리는 불변성을 지켜서 업데이트해야한다! 이것만 기억합시다

react-virtualized

현재 코드는 화면에 몇개 보이지 않지만 2500개의 데이터를 초기에 렌더링을 하게됩니다. React-virtualized 는 눈에 보이지 않는 컴포넌트를 렌더링하지 않고 크기만 차지하고 있다가 스크롤을 통해 보여지면 그때 렌더링해 자원의 낭비를 막을 수 있는 라이브러리 입니다.

yarn add react-virtualized

해당 라이브러리를 추가했으면 TodoList와 TodoListItem 컴포넌트를 수정해야 합니다.

import React, { useCallback } from 'react';
import { List } from 'react-virtualized';
import TodoListItem from './TodoListItem';
import './TodoList.scss';
const TodoList = ({ todos, onRemove, onToggle }) => {
  const rowRenderer = useCallback(
    ({ index, key, style }) => {
      const todo = todos[index];
      return (
        <TodoListItem
          todo={todo}
          key={key}
          onRemove={onRemove}
          onToggle={onToggle}
          style={style}
        />
      );
    },
    [todos, onRemove, onToggle],
  );
  return (
    <List
      className="TodoList"
      width={512}
      height={513}
      rowCount={todos.length}
      rowHeight={51}
      rowRenderer={rowRenderer}
      list={todos}
      style={{ outline: 'none' }}
    />
  );
};

export default React.memo(TodoList);

react-virtualized의 List컴포넌트를 사용합니다. List컴포넌트를 사용할때는 리렌더링할 리스트의 크기, 항목의 높이와 리렌더링해주는 함수를 props로 설정해줘야 합니다. 그러면 해당 props로 최적화하여 컴포넌트를 렌더링해줍니다.

TodoListItem에 props로 style을 추가했으니 컴포넌트도 수정해줘야합니다.

import React from 'react';
import {
  MdCheckBoxOutlineBlank,
  MdCheckBox,
  MdRemoveCircleOutline,
} from 'react-icons/md';
import cn from 'classnames';
import './TodoListItem.scss';

const TodoListItem = ({ todo, onRemove, onToggle, style }) => {
  const { id, text, checked } = todo;

  return (
    <div className="TodoListItem-virtualized" style={style}>
      <div className="TodoListItem">
        <div
          className={cn('checkbox', { checked })}
          onClick={() => onToggle(id)}
        >
          {checked ? <MdCheckBox /> : <MdCheckBoxOutlineBlank />}
          <div className="text">{text}</div>
        </div>
        <div
          className="remove"
          onClick={() => {
            onRemove(id);
          }}
        >
          <MdRemoveCircleOutline />
        </div>
      </div>
    </div>
  );
};

export default React.memo(
  TodoListItem,
  (prevProps, nextProps) => prevProps.todo === nextProps.todo,
);

크롬 개발자 도구로 performance 측정을 해보면 렌더링 속도가 더 빨라진것을 확인할 수 있습니다.

컴포넌트 최적화 작업에 너무 목숨걸 필요는 없습니다 왜냐면 렌더링 속도자체가 기본적으로 빠르기 때문입니다. 만약 리스트의 항목이 100개 이상넘어가고 업데이트가 자주 이뤄지는 컴포넌트에 대해서만 최적화를 신경써주면 될것같습니다.

'Javascript > React' 카테고리의 다른 글

#10 SPA 와 Routing  (0) 2020.02.24
#9 immer를 사용한 불변성(Immutability) 유지  (0) 2020.02.24
#8 React todo-app 1  (0) 2020.02.17
#7 Component Styling  (0) 2020.02.17
#6 React Hooks  (0) 2020.02.14
Posted by yongminLEE
2020. 2. 17. 18:12


1. 프로젝트 생성 및 필요한 라이브러리 설치

yarn create react-app todo-app
cd todo-app
yarn add styled-components react-icons


2. Prettier 설정

// 프로젝트의 최상위 디렉토리에 .prettierrc 파일 생성
{
  "singleQuote": true,
  "semi": true,
  "useTabs": false,
  "tabWidth": 2,
  "trailingComma": "all",
  "printWidth": 80
}


3. index.css, App.js 초기화

/*index.css 초기화*/
body {
  margin: 0;
  padding: 0;
  background-color: rgba(128,128,128,0.3);
}


//App.js 초기화
import React from 'react';
import './App.css';

function App() {
  return (
    <>
      <div>todo start !</div>
    </>
  );
}

export default App;


4. UI 구성 - 컴포넌트의 종류와 기능

  • TodoTemplate : 화면을 가운데로 정렬, 앱 타이틀 출력, children으로 내부 jsx를 props로 받아서 렌더링
  • TodoInsert : 새로운 항목 입력 및 추가, state를 통한 인풋의 상태관리
  • TodoListItem : list item 정보 출력, todo 객체를 props로 받아서 상태에 따른 (done, delete 등) 다른 스타일의 ui 적용
  • TodoList : todos 배열을 props로 받아 map을 이용해 여러개의 TodoListItem 컴포넌트로 변환


5. TodoTemplate UI 구현

// todo-app/src/components/StyledTodoTemplate.js
import React from 'react';
import styled from 'styled-components';

const TodoTemplate = styled.div`
  width: 512px;
  margin: 6rem auto auto auto;
  border-radius: 4px;
  overflow: hidden;

  .app-title {
    background: blueviolet;
    color: white;
    height: 4rem;
    font-size: 1.5rem;
    display: flex;
    align-items: center;
    justify-content: center;
  }

  .content {
    background: white;
  }
`;

const StyledTodoTemplate = ({ children }) => {
  return (
    <TodoTemplate>
      <div className="app-title">TODO LIST</div>
      <div className="content">{children}</div>
    </TodoTemplate>
  );
};

export default StyledTodoTemplate;


6. TodoInsert UI 구현

// todo-app/src/components/StyledTodoInsert.js
import React from 'react';
import styled from 'styled-components';
import { MdAdd } from 'react-icons/md';

const Form = styled.form`
  display: flex;
  background: #495057;

  input {
    /*기본 스타일 초기화*/
    background: none;
    outline: none;
    border: none;

    padding: 0.5rem;
    font-size: 1.125rem;
    line-height: 1.5;
    color: white;

    &::placeholder {
      color: yellow;
    }

    flex: 1;
  }

  button {
    /*기본 스타일 초기화*/
    background: none;
    outline: none;
    border: none;

    background: rgba(128, 128, 128, 0.2);
    color: white;
    padding: auto 1rem;
    font-size: 1.5rem;
    display: flex;
    align-items: center;
    cursor: pointer;
    transition: 0.1s background ease-in;
    &:hover {
      background: rgba(128, 128, 128, 0.8);
    }
  }
`;

const StyledTodoInsert = () => {
  return (
    <Form>
      <input placeholder="insert job" />
      <button type="submit">
        <MdAdd />
      </button>
    </Form>
  );
};

export default StyledTodoInsert;


7. TodoListItem UI 구현

// todo-app/src/components/StyledTodoListItem.js

import React from 'react';
import {
  MdCheckBoxOutlineBlank,
  MdCheckBox,
  MdRemoveCircleOutline,
} from 'react-icons/md';
import styled from 'styled-components';

const TodoListItem = styled.div`
  padding: 1rem;
  display: flex;
  align-items: center;
  &:nth-child(even) {
    background: #f8f9fa;
  }

  .checkbox {
    cursor: pointer;
    flex: 1;
    display: flex;
    align-items: center;

    svg {
      font-size: 1.5rem;
    }

    .text {
      margin-left: 0.5rem;
      flex: 1;
    }

    &.checkd {
      svg {
        color: #22b8cf;
      }
      .text {
        color: #adb5bd;
        text-decoration: line-through;
      }
    }
  }

  .remove {
    display: flex;
    align-items: center;
    font-size: 1.5rem;
    color: #ff6b6b;
    cursor: pointer;
    &:hover {
      color: #ff8787;
    }
  }

  & + & {
    border-top: 1px solid #dee2e6;
  }
`;

const StyeldTodoListItem = () => {
  return (
    <TodoListItem>
      <div className="checkbox">
        <MdCheckBoxOutlineBlank />
        <div className="text">job</div>
      </div>
      <div className="remove">
        <MdRemoveCircleOutline />
      </div>
    </TodoListItem>
  );
};

export default StyeldTodoListItem;


8. TodoList UI 구현

// todo-app/src/components/StyledTodoList.js

import React from 'react';
import styled from 'styled-components';
import StyledTodoListItem from './StyledTodoListItem';

const TodoList = styled.div`
  min-height: 320px;
  max-height: 513px;
  overflow-y: auto;
`;

const StyledTodoLIst = () => {
  return (
    <TodoList>
      <StyledTodoListItem />
      <StyledTodoListItem />
      <StyledTodoListItem />
    </TodoList>
  );
};

export default StyledTodoLIst;


UI가 구현된 컴포넌트들을 App.js 에서 렌더링

// todo-app/src/App.js

import React from 'react';
import './App.css';
import StyledTodoTemplate from './components/StyledTodoTemplate';
import StyledTodoInsert from './components/StyledTodoInsert';
import StyledTodoList from './components/StyledTodoList';

function App() {
  return (
    <StyledTodoTemplate>
      <StyledTodoInsert />
      <StyledTodoList />
    </StyledTodoTemplate>
  );
}

export default App;


9. 기능구현1 - App에서 todos 상태 사용

// src/App.js

import React, { useState } from 'react';
import './App.css';
import StyledTodoTemplate from './components/StyledTodoTemplate';
import StyledTodoInsert from './components/StyledTodoInsert';
import StyledTodoList from './components/StyledTodoList';

function App() {
  const [todos, setTodos] = useState([
    {
      id: 1,
      text: 'job1',
      check: true,
    },
    {
      id: 2,
      text: 'job 22',
      check: false,
    },
    {
      id: 3,
      text: 'job 333',
      check: true,
    },
  ]);

  return (
    <StyledTodoTemplate>
      <StyledTodoInsert />
      <StyledTodoList todos={todos} />
    </StyledTodoTemplate>
  );
}

export default App;


// src/components/StyledTodoList.js

import React from 'react';
import styled from 'styled-components';
import StyledTodoListItem from './StyledTodoListItem';

const TodoList = styled.div`
  min-height: 320px;
  max-height: 513px;
  overflow-y: auto;
`;

const StyledTodoLIst = ({ todos }) => {
  return (
    <TodoList>
      {todos.map(todo => (
        <StyledTodoListItem todo={todo} key={todo.id} />
      ))}
    </TodoList>
  );
};

export default StyledTodoLIst;


// src/components/StyledTodoListItem.js

import React from 'react';
import {
  MdCheckBoxOutlineBlank,
  MdCheckBox,
  MdRemoveCircleOutline,
} from 'react-icons/md';
import styled, { css } from 'styled-components';

const TodoListItem = styled.div`
  padding: 1rem;
  display: flex;
  align-items: center;

  &:nth-child(even) {
    background: #f8f9fa;
  }

  .checkbox {
    cursor: pointer;
    flex: 1;
    display: flex;
    align-items: center;

    svg {
      font-size: 1.5rem;
    }

    .text {
      margin-left: 0.5rem;
      flex: 1;

      ${props =>
        props.checked &&
        css`
          color: #adb5bd;
          text-decoration: line-through;
        `};
    }
  }

  .remove {
    display: flex;
    align-items: center;
    font-size: 1.5rem;
    color: #ff6b6b;
    cursor: pointer;

    &:hover {
      color: #ff8787;
    }
  }

  & + & {
    border-top: 1px solid #dee2e6;
  }
`;

const StyeldTodoListItem = ({ todo }) => {
  const { text, check } = todo;

  return (
    <TodoListItem checked={check}>
      <div className="checkbox">
        {check ? <MdCheckBox /> : <MdCheckBoxOutlineBlank />}
        <div className="text">{text}</div>
      </div>
      <div className="remove">
        <MdRemoveCircleOutline />
      </div>
    </TodoListItem>
  );
};

export default StyeldTodoListItem;


10. 기능구현2 - 항목 추가 기능

// todo-app/src/App.js

import React, { useState, useRef, useCallback } from 'react';
import './App.css';
import StyledTodoTemplate from './components/StyledTodoTemplate';
import StyledTodoInsert from './components/StyledTodoInsert';
import StyledTodoList from './components/StyledTodoList';

function App() {
  const [todos, setTodos] = useState([
    {
      id: 1,
      text: 'job1',
      check: true,
    },
    {
      id: 2,
      text: 'job 22',
      check: false,
    },
    {
      id: 3,
      text: 'job 333',
      check: true,
    },
  ]);

  const nextId = useRef(4);

  const onInsert = useCallback(
    text => {
      const todo = {
        id: nextId.current,
        text,
        check: false,
      };
      setTodos(todos.concat(todo));
      nextId.current += 1;
    },
    [todos],
  );

  return (
    <StyledTodoTemplate>
      <StyledTodoInsert onInsert={onInsert} />
      <StyledTodoList todos={todos} />
    </StyledTodoTemplate>
  );
}

export default App;


//todo-app/src/components/StyledTodoInsert.js

import React, { useState, useCallback } from 'react';
import styled from 'styled-components';
import { MdAdd } from 'react-icons/md';

const Form = styled.form`
  display: flex;
  background: #495057;

  input {
    /*기본 스타일 초기화*/
    background: none;
    outline: none;
    border: none;

    padding: 0.5rem;
    font-size: 1.125rem;
    line-height: 1.5;
    color: white;

    &::placeholder {
      color: yellow;
    }

    flex: 1;
  }

  button {
    /*기본 스타일 초기화*/
    background: none;
    outline: none;
    border: none;

    background: rgba(128, 128, 128, 0.2);
    color: white;
    padding: auto 1rem;
    font-size: 1.5rem;
    display: flex;
    align-items: center;
    cursor: pointer;
    transition: 0.1s background ease-in;
    &:hover {
      background: rgba(128, 128, 128, 0.8);
    }
  }
`;

const StyledTodoInsert = ({ onInsert }) => {
  const [value, setValue] = useState('');

  // useCallback을 이용하여 컴포넌트가 리렌더링 될때마다 함수를 새로만드는것이 아니라 재사용
  const onChange = useCallback(e => {
    setValue(e.target.value);
  }, []);

  const onSubmit = useCallback(
    e => {
      onInsert(value);
      setValue('');
      e.preventDefault(); // submit 이벤트의 브라우저 새로고침 불허
    },
    [onInsert, value],
  );

  return (
    <Form onSubmit={onSubmit}>
      <input placeholder="insert job" value={value} onChange={onChange} />
      <button type="submit">
        <MdAdd />
      </button>
    </Form>
  );
};

export default StyledTodoInsert;


11. 기능구현3 - 삭제 기능 

// todo-app/src/App.js

//...

function App() {
  //... 
    
  const onRemove = useCallback(
    id => {
      setTodos(todos.filter(todo => todo.id !== id)); //filter 함수 이용
    },
    [todos],
  );

  return (
    <StyledTodoTemplate>
      <StyledTodoInsert onInsert={onInsert} />
      <StyledTodoList todos={todos} onRemove={onRemove} />
    </StyledTodoTemplate>
  );
};

export default App;


//todo-app/src/components/StyledTodoList.js

import React from 'react';
import styled from 'styled-components';
import StyledTodoListItem from './StyledTodoListItem';

const TodoList = styled.div`
  min-height: 320px;
  max-height: 513px;
  overflow-y: auto;
`;

const StyledTodoLIst = ({ todos, onRemove }) => {
  return (
    <TodoList>
      {todos.map(todo => (
        <StyledTodoListItem todo={todo} key={todo.id} onRemove={onRemove} />
      ))}
    </TodoList>
  );
};

export default StyledTodoLIst;


//todo-app/src/components/StyledTodoListItem.js

//...

const StyeldTodoListItem = ({ todo, onRemove }) => {
  const { id, text, check } = todo;

  return (
    <TodoListItem checked={check}>
      <div className="checkbox">
        {check ? <MdCheckBox /> : <MdCheckBoxOutlineBlank />}
        <div className="text">{text}</div>
      </div>
      <div className="remove" onClick={() => onRemove(id)}>
        <MdRemoveCircleOutline />
      </div>
    </TodoListItem>
  );
};

export default StyeldTodoListItem;


12. 기능구현4 - 수정기능

// todo-app/src/App.js

//...

function App() {

  //...

  const onToggle = useCallback(
    id => {
      setTodos(
        todos.map(todo =>
          todo.id === id ? { ...todo, check: !todo.check } : todo,
        ),
      );
    },
    [todos],
  );

  return (
    <StyledTodoTemplate>
      <StyledTodoInsert onInsert={onInsert} />
      <StyledTodoList todos={todos} onRemove={onRemove} onToggle={onToggle} />
    </StyledTodoTemplate>
  );
}

export default App;


// todo-app/src/components/StyeldTodoList.js

//...

const StyledTodoLIst = ({ todos, onRemove, onToggle }) => {
  return (
    <TodoList>
      {todos.map(todo => (
        <StyledTodoListItem
          todo={todo}
          key={todo.id}
          onRemove={onRemove}
          onToggle={onToggle}
        />
      ))}
    </TodoList>
  );
};

export default StyledTodoLIst;


// todo-app/src/components/StyledTodoListItem.js

//...

const StyeldTodoListItem = ({ todo, onRemove, onToggle }) => {
  const { id, text, check } = todo;

  return (
    <TodoListItem check={check}>
      <div className="checkbox" onClick={() => onToggle(id)}>
        {check ? <MdCheckBox /> : <MdCheckBoxOutlineBlank />}
        <div className="text">{text}</div>
      </div>
      <div className="remove" onClick={() => onRemove(id)}>
        <MdRemoveCircleOutline />
      </div>
    </TodoListItem>
  );
};

export default StyeldTodoListItem;


'Javascript > React' 카테고리의 다른 글

#9 immer를 사용한 불변성(Immutability) 유지  (0) 2020.02.24
#8-1 컴포넌트 최적화  (0) 2020.02.17
#7 Component Styling  (0) 2020.02.17
#6 React Hooks  (0) 2020.02.14
#5 React Component Lifecycle  (0) 2020.02.13
Posted by yongminLEE
2020. 2. 17. 18:08

  1. Sass
  2. styled-components


Sass

  • css 전처리기
  • 복잡한 작업을 쉽게 해주고, 스타일 코드의 재활용성, 가독성을 높여 유지보수의 용이함 확보
  • https://heropy.blog/2018/01/31/sass/


styled-components

import React from 'react';
import styled, { css } from 'styled-components';

//tagged template literal 문법이용한 styled component
const Box = styled.div`
  background: ${props => props.color || 'blue'};
  padding: 1 rem;
  display: flex;
`;

const Button = styled.button`
  background: white;
  color: black;
  border-radius: 4px;
  padding: 0.5rem;
  display: flex;
  align-items: center;
  justify-content: center;
  box-sizing: border-box;
  font-size: 1rem;
  font-weight: 600;

  /* &으로 자기자신 선택 */
  &:hover { 
    background: black;
  }
  
  & + button {
    margin-left: 1rem;
  }
`;
  
  const StyledComponent = () => {
  return (
    <Box color="black">
      <Button>left</Button>
      <Button>right</Button>
    </Box>
  );
};

export default StyledComponent;
  • 자바스크립트파일 안에 스타일을 선언하는 'CSS-in-JS' 방식
  • Tagged 템플릿 리터릴문법 문법을 통해 스타일을 전달하면, 해당 스타일이 적용된 리액트 컴포넌트가 생성
    • 템플릿 리터럴 : 일반 문자열과 다르게 ` (backtick) 사이에 작성하며 ${ ...}를 삽입하여 객체나 함수를 전달할 수 있다
    • Tagged 템플릿 리터럴 : 템플릿 리터럴 앞에 함수명이 있으면 해당 함수가 호출되고 템플릿 리터럴의 값이 함수에 전달되어 함수에서 템플릿 안의 값을 온전히 추출할 수 있다.
      이를 tagged template literals 이라고 한다


// ...

const Button = styled.button`
/* ... */

  ${props =>
    props.inverted &&
    css`
      background: none;
      border: 2px solid white;
      color: white;
      &:hover {
        background: white;
        color: black;
      }
    `};

/* ... */
`;

//...
  • props에 따른 조건부 스타일링
  • css` ... ` 로 감싸주어서 tagged 템플릿 리터럴을 사용해 주어야 한다


//...

//tagged template literal 문법이용한 styled component
const Box = styled.div`
  background: ${props => props.color || 'blue'};
  padding: 1 rem;
  display: flex;
  width: 1024px;
  margin: 0 auto;

  @media (max-width: 1024px) {
    width: 768px;
    background: ${props => props.color || 'red'};
  }
  
  @media (max-width: 768px) {
    width: 100%;
    background: ${props => props.color || 'green'};
  }
`;

//...
  • 반응형 디자인1 : css에서 할때와 동일


const sizes = {
  desktop: 1024,
  tablet: 768
};

// 위에있는 size 객체에 따라 자동으로 media 쿼리 함수를 만든다
// 참고: https://www.styled-components.com/docs/advanced#media-templates
const media = Object.keys(sizes).reduce((acc, label) => {
  acc[label] = (...args) => css`
    @media (max-width: ${sizes[label] / 16}em) {
      ${css(...args)};
    }
  `;

  return acc;
}, {});

const Box = styled.div`
  /* props 로 넣어준 값을 직접 전달해줄 수 있습니다. */
  background: ${props => props.color || 'blue'};
  padding: 1rem;
  display: flex;
  width: 1024px;
  margin: 0 auto;
  ${media.desktop`width: 768px;`}
  ${media.tablet`width: 768px;`};
`;
  • 반응형디자인2 : styled-components에서 제공하는 유틸함수를 사용


'Javascript > React' 카테고리의 다른 글

#8-1 컴포넌트 최적화  (0) 2020.02.17
#8 React todo-app 1  (0) 2020.02.17
#6 React Hooks  (0) 2020.02.14
#5 React Component Lifecycle  (0) 2020.02.13
#4 Component 반복  (0) 2020.02.12
Posted by yongminLEE
2020. 2. 14. 12:27


Hooks

  • react v16.8에 새로 도입된 기능
  • 함수형 컴포넌트에서는 할 수 없었던 클래스컴포넌트만의 다양한 작업을 함수형 컴포넌트에서도 가능하게 해주는 함수
  • 오직 React 함수 내에서 hook을 호출해야 한다 : hook을 일반적인 JS함수 내에서 호출하면 안된다.
  • 항상 React 함수의 최상위에서 hook을 호출 : 조건문, 반복문등에서 호출하면 안된다
  • 대표적인 hooks
    1. useState
    2. useEffect
    3. useReducer
    4. useMemo
    5. useCallback
    6. custom Hooks


useState

import React, {useState, useEffect } from 'react';

const Counter = () => {
  const [number, setNumber] = useState(0);
  const handleClick = () => {
    setNumber(number + 1);
  };

  return (
    <>
      <hr />
      <h1>{number}</h1>
      <button onClick={handleClick}>+1</button>
      <hr />
    </>
  );
};

export default Counter;
  • 함수형 컴포넌트에서도 가변적인 상태값을을 사용할 수 있게 해준다
  • 함수의 파라미터에 상태의 기본값을 넣어줌
  • 함수는 배열을 반환하는데, 배열의 첫 번째 원소는 상태 값, 두번째 원소는 상태를 설정하는 함수
  • 하나의 useState함수는 하나의 상태 값만 관리할 수 있으므로, 컴포넌트에서 관리해야 할 상태가 여러개라면 useState를 여러번 사용해야 함


useEffect

import React, {useState, useEffect } from 'react';

const Counter = () => {
  const [number, setNumber] = useState(0);
  const handleClick = () => {
    setNumber(number + 1);
  };

  useEffect(() => {
    console.log('rendering complete');
    console.log({ number });
  });

  return (
    <>
      <hr />
      <h1>{number}</h1>
      <button onClick={handleClick}>+1</button>
      <hr />
    </>
  );
};

export default Counter;
  • 리액트 컴포넌트가 렌더링될 때마다 특정 작업을 수행하도록 설정하는 함수
  • 클래스형 컴포넌트의 componentDidMount와 compontDidUpdate를 합친 형태


//...

  useEffect(() => {
    console.log('rendering complete');
    console.log({ number });
  },[]);		// 마운트될 때만 실행하고 업데이트 될때는 실행하지 않고 싶을때

//...
  • useEffect에서 설정한 함수를 컴포넌트가 화면에 맨 처음 렌더링될 때만 실행하고, 업데이트 될때는 실해하지 않으려면 함수의 두번째 파라미터로 비어있는 배열을 넣어준다


//...

  const [number, setNumber] = useState(0);

//...

  useEffect(() => {
    console.log('rendering complete');
    console.log({ number });
  },[number]);		//특정 값이 업데이트 될 때만 실행하고 싶을 때
  
//...
  • 특정 값이 업데이트 될 때만 useEffect를 실행하고 싶을 때는 두번째 파라미터로 전달되는 배열 안에 검사하고 싶은 값을 넣어준다.


//...

useEffect(() => {
    console.log('rendering complete');
    console.log({ number });

    return () => {		// 컴포넌트가 언마운트 되기전이나 업데이트되기 직전에 
      console.log('cleanup');	// 어떤 작업을 수행하고 싶으면 해당 작업을 수행하는
    };				// cleanup 함수를 return
  });
  
  //...
  • 컴포넌트가 언마운트되기 전이나 업데이트되기 직전에 어떠한 작업을 수행하고 싶을 때는 useEffect에서 cleanup함수를 return 한다


//...

useEffect(() => {
    console.log('rendering complete');
    console.log({ number });

    return () => {	
      console.log('cleanup');
    };			
  }, []);	//언마운트될 때만 cleanup 함수를 호출하고 싶은 경우
  
  //...
  • 언마운트될 때만 cleanup함수를 호출하고 싶은 경우 두번째 파라미터로 빈 배열을 전달


useReducer

import React, { useReducer } from 'react';

// reducer 함수
function reducer(state, action) {
  //action.type에 따라 다른 작업 수행
  switch (action.type) {
    case 'INCRESE':
      return { number: state.number + 1 };
    case 'DECRESE':
      return { number: state.number - 1 };
    default:
      return { number: state.number };
  }
} // 컴포넌트 업데이트 로직을 컴포넌트 바깥으로 빼냄

const Counter = () => {
  const [state, dispatch] = useReducer(reducer, { number: 0 });

  return (
    <>
      <hr />
      <h1>{state.number}</h1>
      <button onClick={() => dispatch({ type: 'INCRESE' })}>+1</button>
      <button onClick={() => dispatch({ type: 'DECRESE' })}>-1</button>
      <hr />
    </>
  );
};

export default Counter;
  • useState보다 더 다양한 컴포넌트 상황에 따라 다양한 상태를 관리할때 사용하는 hook
  • useReducer는 첫번째 파라미터로 reducer함수를, 두번째 파라미터로는 해당 리듀서의 기본값을 전달받는다.
    • reducer는 state(현재상태)와 action(상태 업데이트를 위한 정보)를 전달받아 새로운 상태를 반환하는 함수, 이때 반환되는 새로운 상태는 반드시 불변성을 지켜야 한다
  • useReducer는 state값과 dispatch함수를 return
    • state : 현재 가리키고 있는 상태
    • dispatch : 액션을 발생시키는 함수, dispacth(action)형태로 사용시 해당 action을 파라미터로 받은 reducer함수를 호출
  • useReducer의 장점은 컴포넌트 업데이트 로직을 컴포넌트 바깥으로 빼낼수 있다는 점


useMemo

import React, { useState, useMemo } from 'react';

const getAverage = numbers => {
  if (numbers.length === 0) return 0;
  const sum = numbers.reduce((a, b) => a + b);
  return sum / numbers.length;
};

const Average = () => {
  const [list, setList] = useState([]);
  const [number, setNumber] = useState('');

  const handleChange = e => {
    setNumber(e.target.value);
  };

  const handleInsert = e => {
    const newList = list.concat(parseInt(number));
    setList(newList);
    setNumber('');
  };
	
  // input의 value가 바뀌는 동안에는 평균값을 계산할 필요가 없으므로
  // list 값이 바뀌었을 때만 연산일 실행하도록 한다
  const avg = useMemo(() => getAverage(list), [list]);

  return (
    <>
      <input value={number} onChange={handleChange} />
      <button onClick={handleInsert}>등록</button>
      <ul>
        {list.map((value, index) => {
          return <li key={index}>{value}</li>;
        })}
      </ul>
      <p> avg : {avg}</p>
      <hr />
    </>
  );
};

export default Average;
  • 메모이제이션된 값을 반환함으로써 useMemo를 사용하면 함수형 컴포넌트 내부에서 발생하는 연산을 최적화
  • 렌더링하는 과정에서 특정 값이 바뀌었을 때만 연산을 실행하고, 원하는 값이 바뀌지 않은경우 이전에 연산했던 결과를 다시 사용하는 방식
  • 첫번째 파라미터로 생성함수를 전달하고, 두번째 파라미터로 의존성 값의 배열을 전달


useCallback

// ...

  //   const handleChange = e => {
  //     setNumber(e.target.value);
  //   };
  const handleChange = useCallback(e => {
    setNumber(e.target.value);
  }, []); // 빈 배열 : 컴포넌트가 처음 렌더링될 때만 함수 생성

  //   const handleInsert = e => {
  //     const newList = list.concat(parseInt(number));
  //     setList(newList);
  //     setNumber('');
  //   };
  const handleInsert = useCallback(
    e => {
      const newList = list.concat(parseInt(number));
      setList(newList);
      setNumber('');
    },[number, list]); // number 또는 list가 변경될 때만 함수 생성
  
  //...
  • 메모이제이션된 콜백을 반환함으로써 불필요한 렌더링 방지
  • useCallback의 첫번째 파라미터에는 생성하고 싶은 함수를 넣고, 두번째 파라미터에는 배열을 넣는다. : 배열에는 어떤 값이 바뀌었을 때 함수를 생성해야하는지 명시
  • 숫자, 문자열, 객체 처럼 일반 값을 재사용할 때는 useMemo를 사용하고, 함수를 재사용하려면 useCallback을 사용


custom Hooks

'Javascript > React' 카테고리의 다른 글

#8 React todo-app 1  (0) 2020.02.17
#7 Component Styling  (0) 2020.02.17
#5 React Component Lifecycle  (0) 2020.02.13
#4 Component 반복  (0) 2020.02.12
#3 React Event Handling  (0) 2020.02.12
Posted by yongminLEE